Long exposure tutorial for water photography: Advanced step-by-step guide
Long exposure water photography creates those dreamlike, ethereal images where rushing water transforms into a silky, smooth surface while the surrounding landscape remains tack sharp. Want to master water photography? Here’s how.
This article was originally published here on the Nikon website.
For magical silky-smooth waterfalls and rivers, the right equipment and techniques are key.
Long exposure water photography creates those dreamlike, ethereal images where rushing water transforms into a silky, smooth surface while the surrounding landscape remains tack sharp. Want to master water photography? Here’s how.
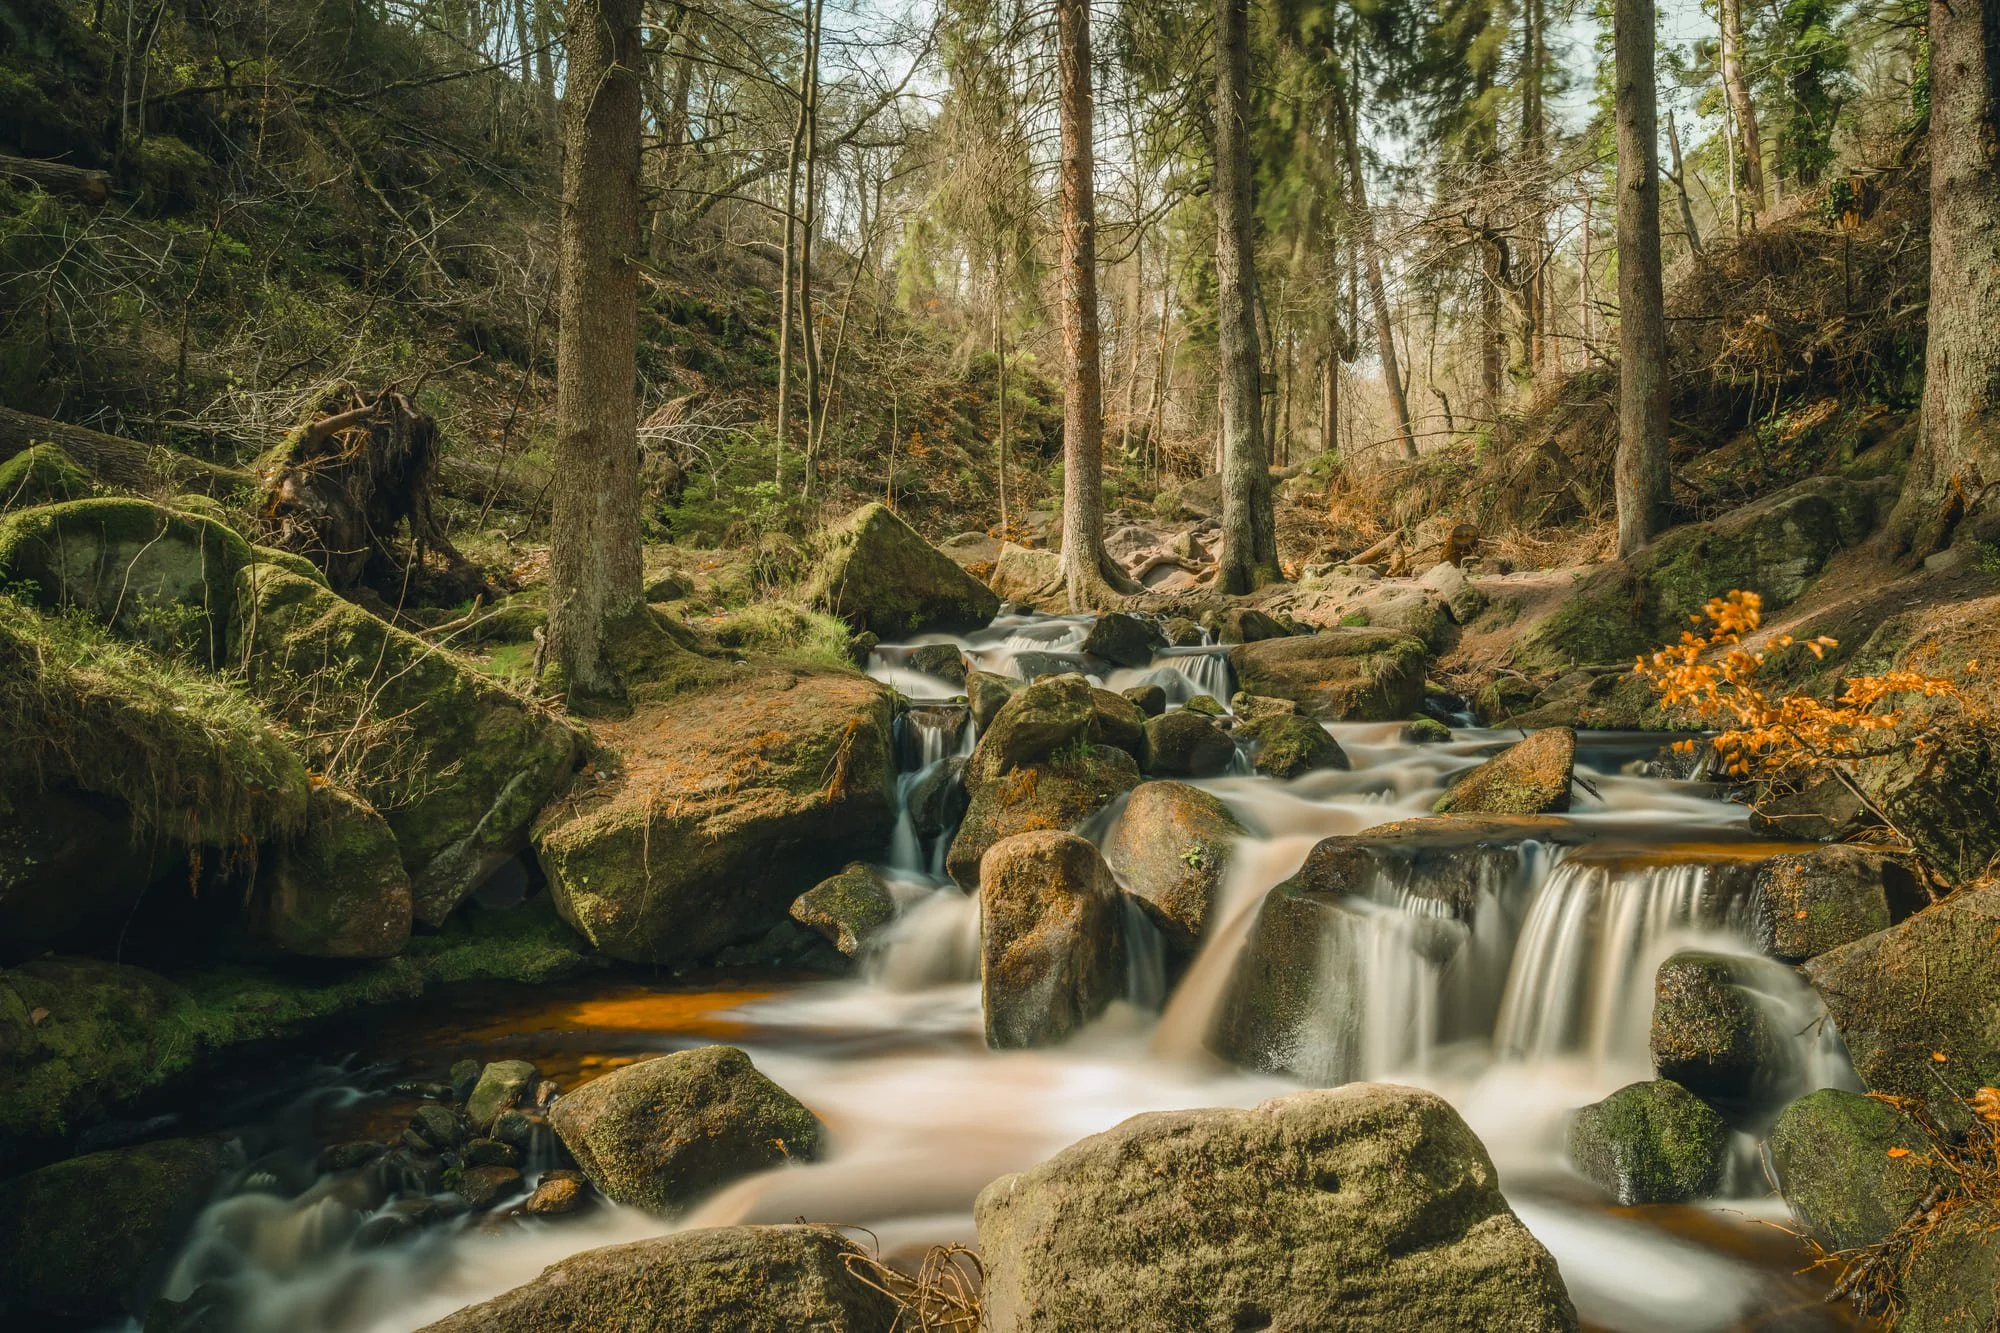
Here, I wanted to convey a sense of quickness with the water, as it was flowing fairly rapidly at this particular point. I wanted to provide context, include the surroundings, and also used the path to the side as a leading line. I really like the bridge as a focal point. No filters were used for this image. Z9 + NIKKOR Z 14-24mm f/2.8 S, 14mm, 0.5 sec, f/22, ISO 40, © Scott Antcliffe
Composition first
Before even thinking about settings, carefully consider your composition. Look for strong leading lines, interesting foreground elements (rocks, foliage, reflections) and a balance within the scene. The static elements in your frame are just as crucial as the blurred water. Experiment with different perspectives – get low to the ground, find a higher vantage point and move around to discover the most engaging composition.
Pro tip
Keep an eye on the water entry and exit points as these can create natural visual anchors where the water flows in and out of your frame.
With this image, once again I wanted to show the fast-flowing nature of the cascade. I used the rocks as foreground interest and ensured the water takes you through the scene from left to tight. No filters were used for this image. Z9 + NIKKOR Z 14-24mm f/2.8 S, 24mm, 0.6 sec, f/22, ISO 40, © Scott Antcliffe
Mastering the set-up and settings
The foundation of great long exposure water imagery lies in a meticulous set-up and precise camera settings:
Stability is paramount: Any movement during a long exposure will result in unwanted blur across the entire frame, not just the water. A sturdy tripod is non-negotiable. Ensure all legs are firmly planted and consider weighing it down with your camera bag or a dedicated weight, especially in windy conditions. If working on uneven ground, take extra care to secure the tripod.
Manual focus precision: Autofocus systems can sometimes struggle with static subjects during long exposures, especially when using Neutral Density (ND) filters, which can darken the viewfinder. Switch to Manual focus and pinpoint focus on your key foreground element or a point of interest within the scene. Once focus is locked, be careful not to accidentally adjust the focus ring. If you then recompose, double check that your frame is in focus.
Choosing the right aperture: While the long exposure effect is primarily controlled by shutter speed, aperture still plays an important role. For landscape photography, a mid-range aperture (typically between f/8 and f/16) often provides a good balance between depth of field and image sharpness. Consider the overall scene and adjust accordingly. If you want a shallow depth of field to isolate a foreground element against blurred water, a wider aperture might be considered but be mindful of the reduced area of sharpness.
Understanding ISO: Keep your ISO as low as possible (typically ISO 100 or 64, depending on your camera’s base ISO) to minimise noise in your images. Since you’ll be using a tripod and potentially ND filters to extend the exposure time, there’s no need to increase the ISO for brighter images.
The crucial shutter speed: This is where the magic happens. The ideal shutter speed for silky smooth water depends on the speed and volume of the water flow and the desired aesthetic. Experimentation is key, but for fast flowing water 1/2 to 2 seconds would be a good starting point. For rivers and gentler falls 2 to 10 seconds would create the classic milky effect.
Neutral Density (ND) filters – your exposure control: To achieve long shutter speeds in daylight, you'll need ND filters to reduce the amount of light entering your lens. These filters come in various strengths, denoted by their optical density or f-stop reduction (e.g., ND4, ND8, ND1000). The higher the number, the longer the exposure. I generally use a 6-stop or 10-stop to get the milky, ethereal effect.
Metering with ND filters: With a strong ND filter attached, your camera’s built-in meter will likely be inaccurate. Meter the scene without the filter first, noting the suggested shutter speed. Then, use the filter’s stop rating to calculate the required long exposure time. For example, if your meter suggests 1/60th of a second without a 10-stop ND filter, your long exposure will be approximately 10 seconds (1/60 -> 1/30 -> 1/15 -> 1/8 -> 1/4 -> 1/2 -> 1 -> 2 -> 4 -> 8 -> 16 – roughly 10 stops). Many smartphone apps such as Lee Stopper Exposure, Photo Friend, Perfect Exposure and Lightmate are available to help with these calculations.
Remote shutter release or self-timer: To eliminate any camera shake caused by pressing the shutter button, use a remote shutter release, the Nikon SnapBridge app, or the camera’s self-timer (2, 5 or 10 seconds).
In this image, I once again let the water flow from the bottom left corner to the top right on the thirds. I also used a tree and rocks on the far right to hold the frame. A Lee Big Stopper (10 stops) and a Lee Circular Polariser were used. Z9 + NIKKOR Z 24-70mm f/2.8 S, 27.5mm, 30 sec, f/11, ISO 125, © Scott Antcliffe
Essential gear for long exposure water photography
Besides the tripod, ND filters and remote mentioned above, I also take a couple of lens cloths with me, waterproof boots and trousers, and I will sometimes use a polariser. The polarising filter is handy as it reduces reflection on wet rocks and enhances the saturation. It will also reduce light, so this will mean requiring a less strong ND filter or a longer exposure.
In this image, I went for the milky feel, but wanted to photograph a little tighter and lower, adding compression, to make you feel as if you are in the water. I feel the composition works well with the water flowing through the centre of the image. A Lee Big Stopper (10 stops) and a Lee Circular Polariser were used. Z9 + NIKKOR Z 24-70mm f/2.8 S, 49mm, 30 sec, f/11, ISO 400, © Scott Antcliffe
Subtle enhancements in post-production
While the goal is to capture a strong image in camera, thoughtful post-production can further enhance your long exposure water photographs:
Basic adjustments: Start with White Balance, exposure, contrast and highlight/shadow adjustments in your preferred editing software.
Sharpening: Apply selective sharpening to the static elements in your image to enhance detail, while avoiding sharpening the blurred water.
Colour correction and saturation: Fine-tune the colours to achieve a natural and pleasing look. Be careful not to oversaturate.
Graduated filters and dodging/burning: Use these tools to subtly balance the exposure across different parts of the image, enhancing details in darker areas or toning down overly bright highlights.
Noise reduction: If you notice any noise in your long exposure images (especially in darker areas), apply subtle noise reduction.
Wrap-UP
Long exposure water photography is incredibly rewarding but requires a little patience and experimentation. The main thing is to enjoy the process of capturing the beauty of the scene and enjoy being in the natural surroundings.
Continue Reading
Aurora photography: A guide to the night sky
The aurora borealis, or northern lights, is one of nature’s most breathtaking phenomena. Seeing and capturing this celestial light display can be a thrilling experience for photographers of all levels. Here’s how to get started.
This article was originally published here on the Nikon website.
Make the most of your aurora adventure with these tried and tested camera settings and editing tips.
The aurora borealis, or northern lights, is one of nature’s most breathtaking phenomena. Seeing and capturing this celestial light display can be a thrilling experience for photographers of all levels. Here’s how to get started.
What is the aurora borealis and when is the best time to see it?
The aurora borealis occurs when charged particles from the sun interact with the Earth’s magnetic field and atmosphere. These particles collide with gases such as oxygen and nitrogen, causing them to emit light in various colours, most commonly green, but also red, pink and purple. This natural light show is most visible in polar regions due to the concentration of the Earth’s magnetic field here.
For those in Europe, the best time to view the aurora borealis is during the winter months, from late September to early April. The long, dark nights of winter provide optimal conditions for seeing the lights, particularly in northern countries such as Norway, Sweden, Finland and Iceland.
Pro tip
The aurora is most active around the equinoxes in March and September, due to the alignment of the Earth’s magnetic field with solar winds.
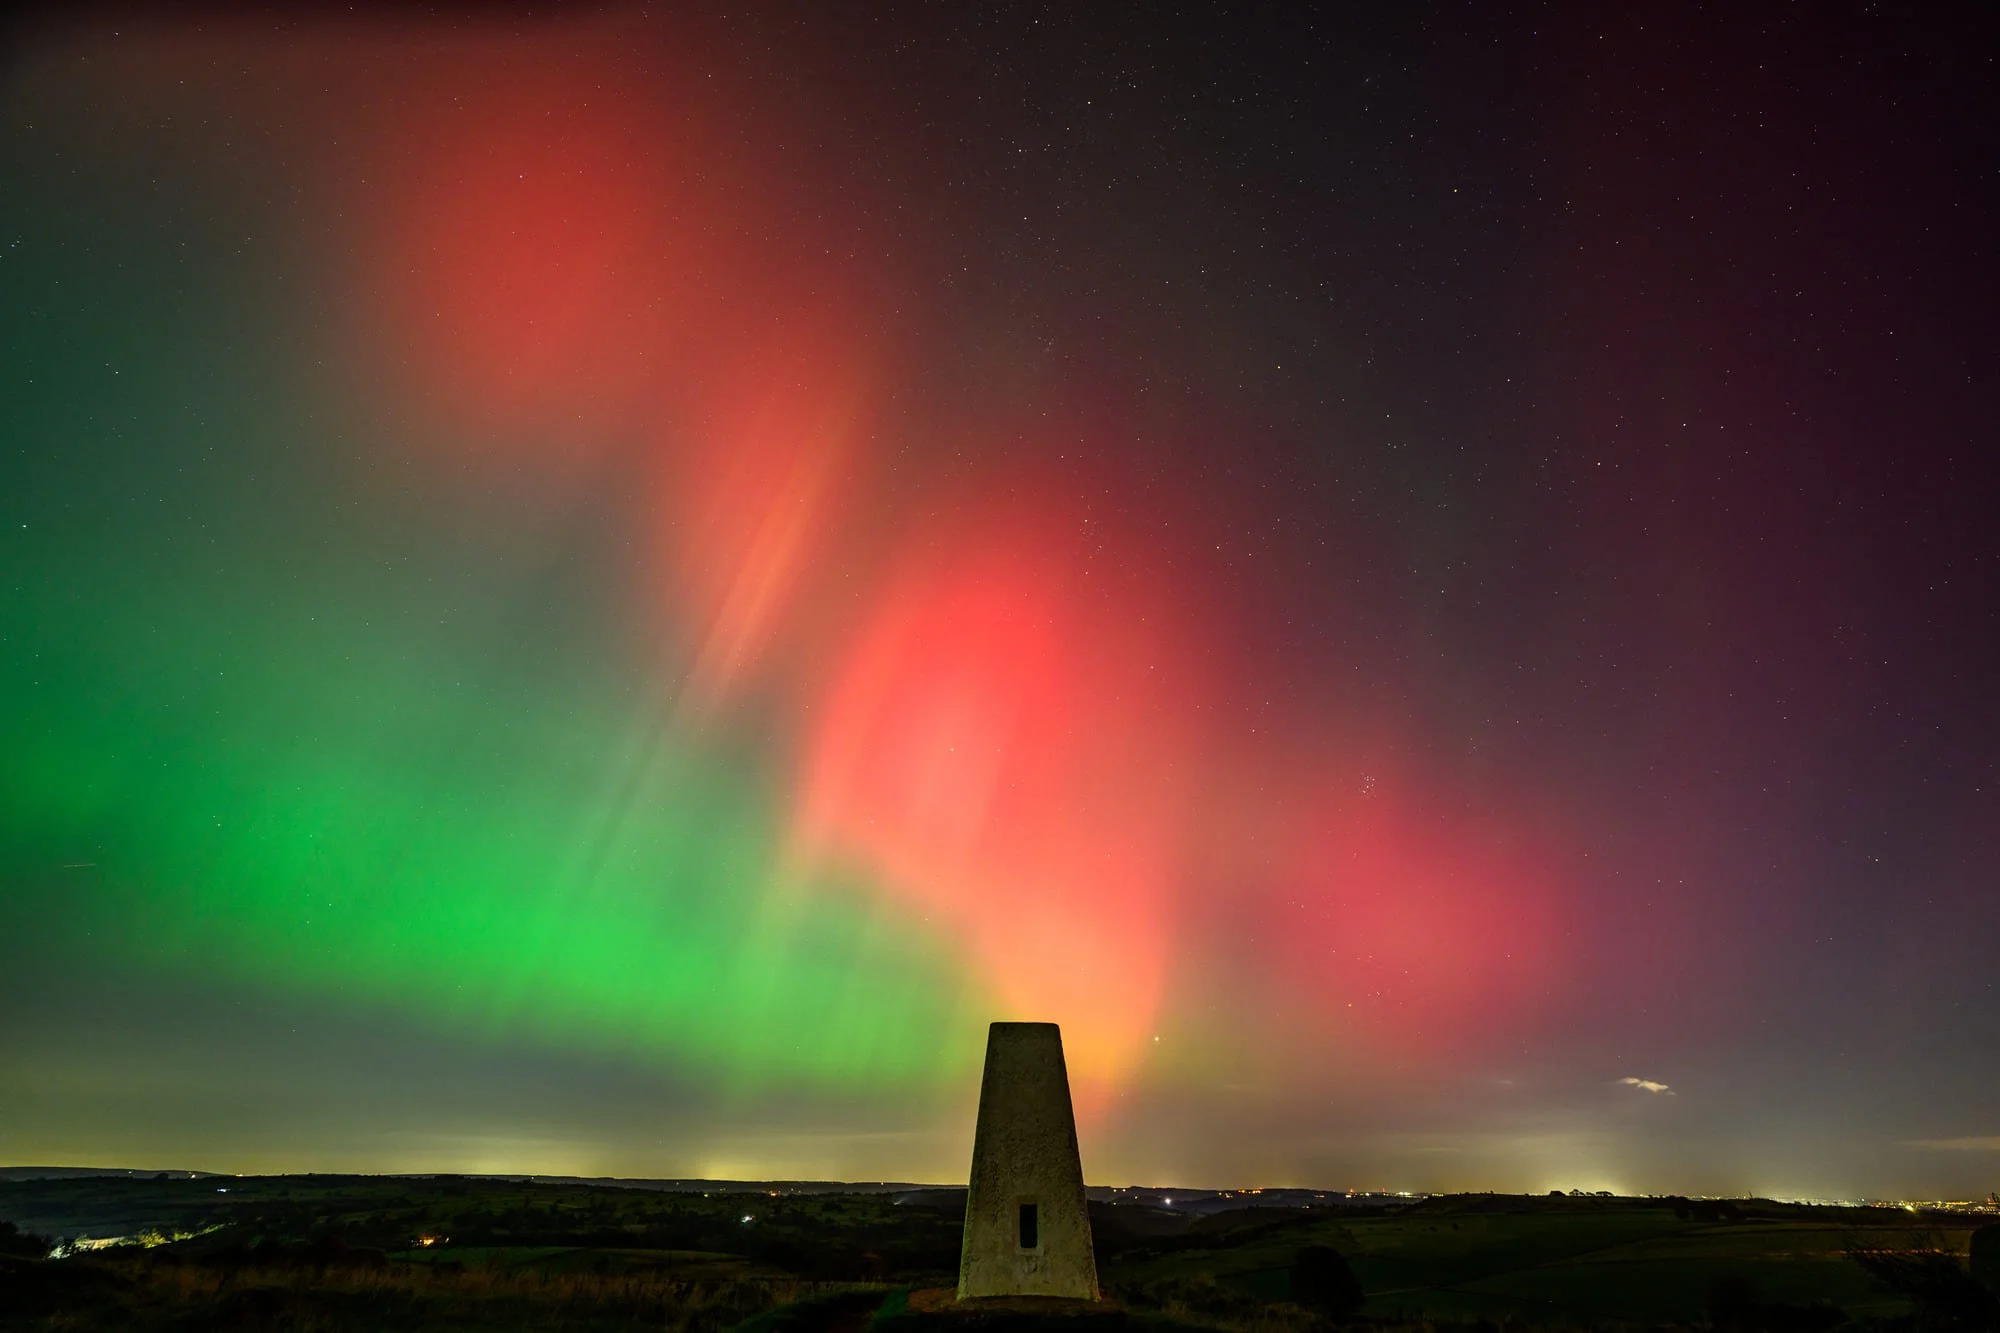
Z9 + NIKKOR Z 14-24mm f/2.8 S, 14mm, 15 sec, f/2.8, ISO 500 © Scott Antcliffe
Nikon’s low-light technology advantages
Photographing the aurora borealis requires a camera that excels in low-light conditions, and Nikon offers several models that are ideal for this purpose. The Nikon Z9 and Z8, with their advanced low-light capabilities and high ISO performance, are perfect for capturing the vibrant colours and subtle details of the aurora.
Paired with Z mount lenses, which offer superior light-gathering abilities, my Z9 ensures sharp and vivid images. Using fast lenses with wide apertures (such as f/1.8 or f/2.8) allows more light to hit the sensor, reducing noise and enhancing image quality in low-light situations.
Z9 + NIKKOR Z 14-24mm f/2.8 S, 14mm, 15 sec, f/2.8, ISO 500 © Scott Antcliffe
Step-by-step guide to night sky camera setup and settings
Choose the right lens: For aurora photography, a wide-angle lens is essential to capture as much of the sky as possible. The NIKKOR Z 14-24mm f/2.8 S or the NIKKOR Z 20mm f/1.8 S are excellent choices. Their wide apertures and fields of view allow you to encompass the entire spectacle of the aurora.
Set up your camera on a tripod: Stability is key in low-light photography. A sturdy tripod (I prefer the Gitzo) will prevent camera shake and ensure sharp images, especially during long exposures.
Shutter speed: Start with a shutter speed of around 10-20 seconds. Longer exposures allow more light to reach the sensor, capturing the aurora’s movement and colours. However, too long an exposure can cause stars to blur due to the Earth’s rotation, so experiment with different times. Anything from 10-25 seconds should yield some pleasing results.
Aperture: Use a wide aperture such as f/1.8 to f/2.8. This maximises the light intake, essential for capturing bright and colourful auroras.
ISO settings: Start with an ISO setting of around 800 to 1600. Higher ISOs will increase the sensor’s sensitivity to light but also introduce noise. Nikon cameras perform exceptionally well in low-light conditions, allowing for higher ISO settings without significant noise.
White Balance: Set your White Balance to ‘Daylight’ or ‘Auto’. This helps maintain the natural colours of the aurora. You can also experiment with different White Balance settings in the menu to achieve different tones in your photos.
Focus mode: For exact precision, use Manual focus to set your focus and fine tune it by focusing on a distant bright star or light source.
Set up Snapbridge. Either set up a remote shutter control or download Nikon’s SnapBridge app so you can set up your camera, stand back and snap from your phone.
Z9 + NIKKOR Z 14-24mm f/2.8 S, 19mm, 25 sec, f/2.8, ISO 500 © Scott Antcliffe
Tips for editing aurora images
Editing is a crucial step in bringing out the best in your aurora photos. Here are some tips:
Adjust exposure and contrast: Slightly increase the exposure if your image appears too dark. Boosting contrast can help define the aurora’s shapes and colours against the night sky.
Enhance colours: Use the saturation and vibrance tools sparingly to bring out the aurora’s natural colours without making them look unnatural. Green is the most common colour, but subtle tweaks can reveal reds and purples that might not be immediately visible.
Reduce noise and sharpen: Even with the best camera settings, some noise is inevitable. Use noise reduction tools in your editing software to clean up the image while preserving details. Minor sharpening can bring out more detail.
Z9 + NIKKOR Z 14-24mm f/2.8 S, 14mm, 15 sec, f/2.8, ISO 200 © Scott Antcliffe
Wrap-UP
Capturing the aurora can be a rewarding experience and, by understanding your camera’s capabilities, setting it up correctly and applying thoughtful edits, you can create stunning images that truly capture its magic. So, bundle up, head out into the cold and get ready to photograph one of the most beautiful sights on Earth.
Continue Reading

Make the most of this summer’s golden hour with backlighting: Advanced step-by-step guide
This technique, where the main light source is behind the subject, can produce dramatic and ethereal effects that transform ordinary scenes into extraordinary photographs.
This article was originally published here on the Nikon website.
Correct positioning, adjusting exposure and low ISO are the keys to harnessing summer rays for backlighting.
As the sun dips low on the horizon casting a warm glow across the landscape, photographers have a unique opportunity to create stunning images using backlighting. This technique, where the main light source is behind the subject, can produce dramatic and ethereal effects that transform ordinary scenes into extraordinary photographs.
Let’s explore the power of backlighting.
When to use backlighting and why
Backlighting is particularly effective during the golden hour, the magical period shortly after sunrise or before sunset when the sun is low in the sky. This time offers soft, warm light that’s perfect for creating atmospheric images with a dreamy quality.
Enhancing drama and mood. Backlighting can add a dramatic effect, especially during golden hour when the light is warm and soft. This is perfect for creating moody, ethereal images.
Creating silhouettes. If you want to emphasise the shape of your subject without focusing on details, backlighting is perfect for producing striking silhouettes against a vibrant sky.
Highlighting translucent subjects. Backlighting works beautifully with translucent subjects, such as leaves, petals or even the fine hairs on a person’s head, making them glow.
D850 + AF-S VR Micro NIKKOR 105mm f/2.8G IF-ED, 105mm, 1/1000 sec, f/4, ISO 100, © Scott Antcliffe
Camera settings for backlit landscape photography
To make the most of backlighting during the golden hour, follow these steps to set up your camera:
Choose your lens. A wide-angle lens (24-35mm) is often ideal for landscape backlighting, while a medium telephoto (85-135mm) works well for portraits.
Set your camera mode. Manual mode gives you the most control over your settings.
Adjust your ISO. Start with a low ISO, around 100-400, to minimise noise. You can increase this if needed for faster shutter speeds or as it becomes darker.
Set your aperture. For landscapes with a wide depth of field, use f/8 to f/11. For portraits with a shallow depth of field, try f/2.8 to f/4.
Determine shutter speed. This will depend on your subject and desired effect. For landscapes, start around 1/250 secs to freeze details that might be moving.
White Balance. Set to ‘Daylight’ or ‘Shade’ for a warmer tone or use a custom White Balance for more control.
Exposure compensation. You may need to use negative exposure compensation (-1 to -2 EV) to avoid overexposure, especially when creating silhouettes.
Metering mode. Spot metering can be helpful when focusing on a specific part of your backlit subject.
Autofocus mode. For stationary subjects, use single-point AF. For moving subjects, consider AF-C (continuous autofocus).
RAW Format. Photograph in RAW to give yourself more flexibility in post-processing.
Z9 + NIKKOR Z 14-24mm f/2.8 S, 21mm, 1/200 sec, f/4.5, ISO 100, © Scott Antcliffe
Composing your backlit image
Composition plays a crucial role in maximising the effect of backlighting. Here are some tips to consider:
Position the sun carefully. Place the sun slightly off to the side or directly behind your subject. This positioning prevents the sun from overpowering your image while still achieving that beautiful backlit glow.
Frame with elements. Use natural elements such as trees, leaves or buildings to frame your subject. This can help block direct sunlight from hitting the lens, reducing lens flare while adding context to your composition.
Experiment with angles. Move around your subject to find the best angle, where the backlight creates a pleasing halo or silhouette. Sometimes even a slight adjustment can make a significant difference in how the light interacts with your subject.
Z9 + AF-S NIKKOR 70-200mm f/2.8E FL ED VR + Mount Adapter FTZ II, 70mm, 1/250 sec, f/2.8, ISO 80, © Scott Antcliffe
Tips for post-processing
Adjust exposure
Start by tweaking the exposure slider to balance your image. Since backlit scenes can often lead to underexposed subjects or overly bright backgrounds, adjust the exposure to bring out details in the shadows without losing the highlights.
Recover highlights and shadows
Use the highlights and shadows sliders to recover lost detail. Lower the highlights to bring back detail in bright areas, and increase the shadows to lift dark areas, revealing more of the landscape.Enhance the warmth
Golden hour light is naturally warm, so use the temperature slider to enhance this effect. Push it slightly toward the yellow/orange spectrum to emphasise the golden glow.Add contrast and clarity
Increase the contrast slider to make your image pop, and use the clarity slider to add mid-tone contrast, enhancing the texture and detail in the landscape.Reduce lens flare
If lens flare is too intense, use the spot removal tool to clean up any distracting spots or unwanted flare, while maintaining the overall backlit effect.Fine-tune with the HSL panel
Use the HSL (hue, saturation and luminance) panel to adjust specific colours. Increase the saturation of warm tones to enhance the golden hour glow and reduce any unwanted cool tones.
Wrap-UP
These adjustments will help you create stunning, balanced backlit landscape images that retain the magic of golden hour. Ready to get started?
Continue Reading
What is crop factor and how do I calculate it? DX and FX explained
Crop factor refers to the ratio between the size of a camera’s image sensor and the size of a 35mm full-frame sensor. It indicates how much of the scene a particular lens can effectively capture on that given sensor size.
This article was originally published here on the Nikon website.
How do sensor sizes affect me as a photographer? Here’s everything you need to know.
When digital cameras first emerged, manufacturers opted to make image sensors smaller and more affordable than the traditional 35mm film frame. This technological shift necessitated a way to describe how a camera’s sensor size impacted the angle of view and field of view compared to 35mm photography. Thus, the concept of crop factor was born.
Here’s my in-depth guide to sensor sizes and crop factor (DX and FX).
What is crop factor?
Crop factor, also known as focal length multiplier, refers to the ratio between the size of a camera’s image sensor and the size of a 35mm full-frame sensor (36mm x 24mm). It indicates how much of the scene a particular lens can effectively capture on that given sensor size.
Nikon’s full-frame FX cameras are identical to 35mm film, giving them a 1.0x crop factor with no multiplier effect. In contrast, Nikon’s line-up of DX cameras features APS-C sized sensors measuring approximately 24mm x 16mm.
Pro tip
To calculate the exact crop factor, you’ll need to divide the diagonal measurement of a 35mm full-frame sensor (43.7mm) by the diagonal measument of your camera’s sensor size. Nikon’s DX line up has a measurement of 28.4mm.
Crop factor: 43.27mm/28.4mm = 1.52x
Nikon mirrorless cameras
At the time of writing, there are three DX mirrorless cameras and seven FX mirrorless cameras you can purchase.
DX cameras:
FX cameras:
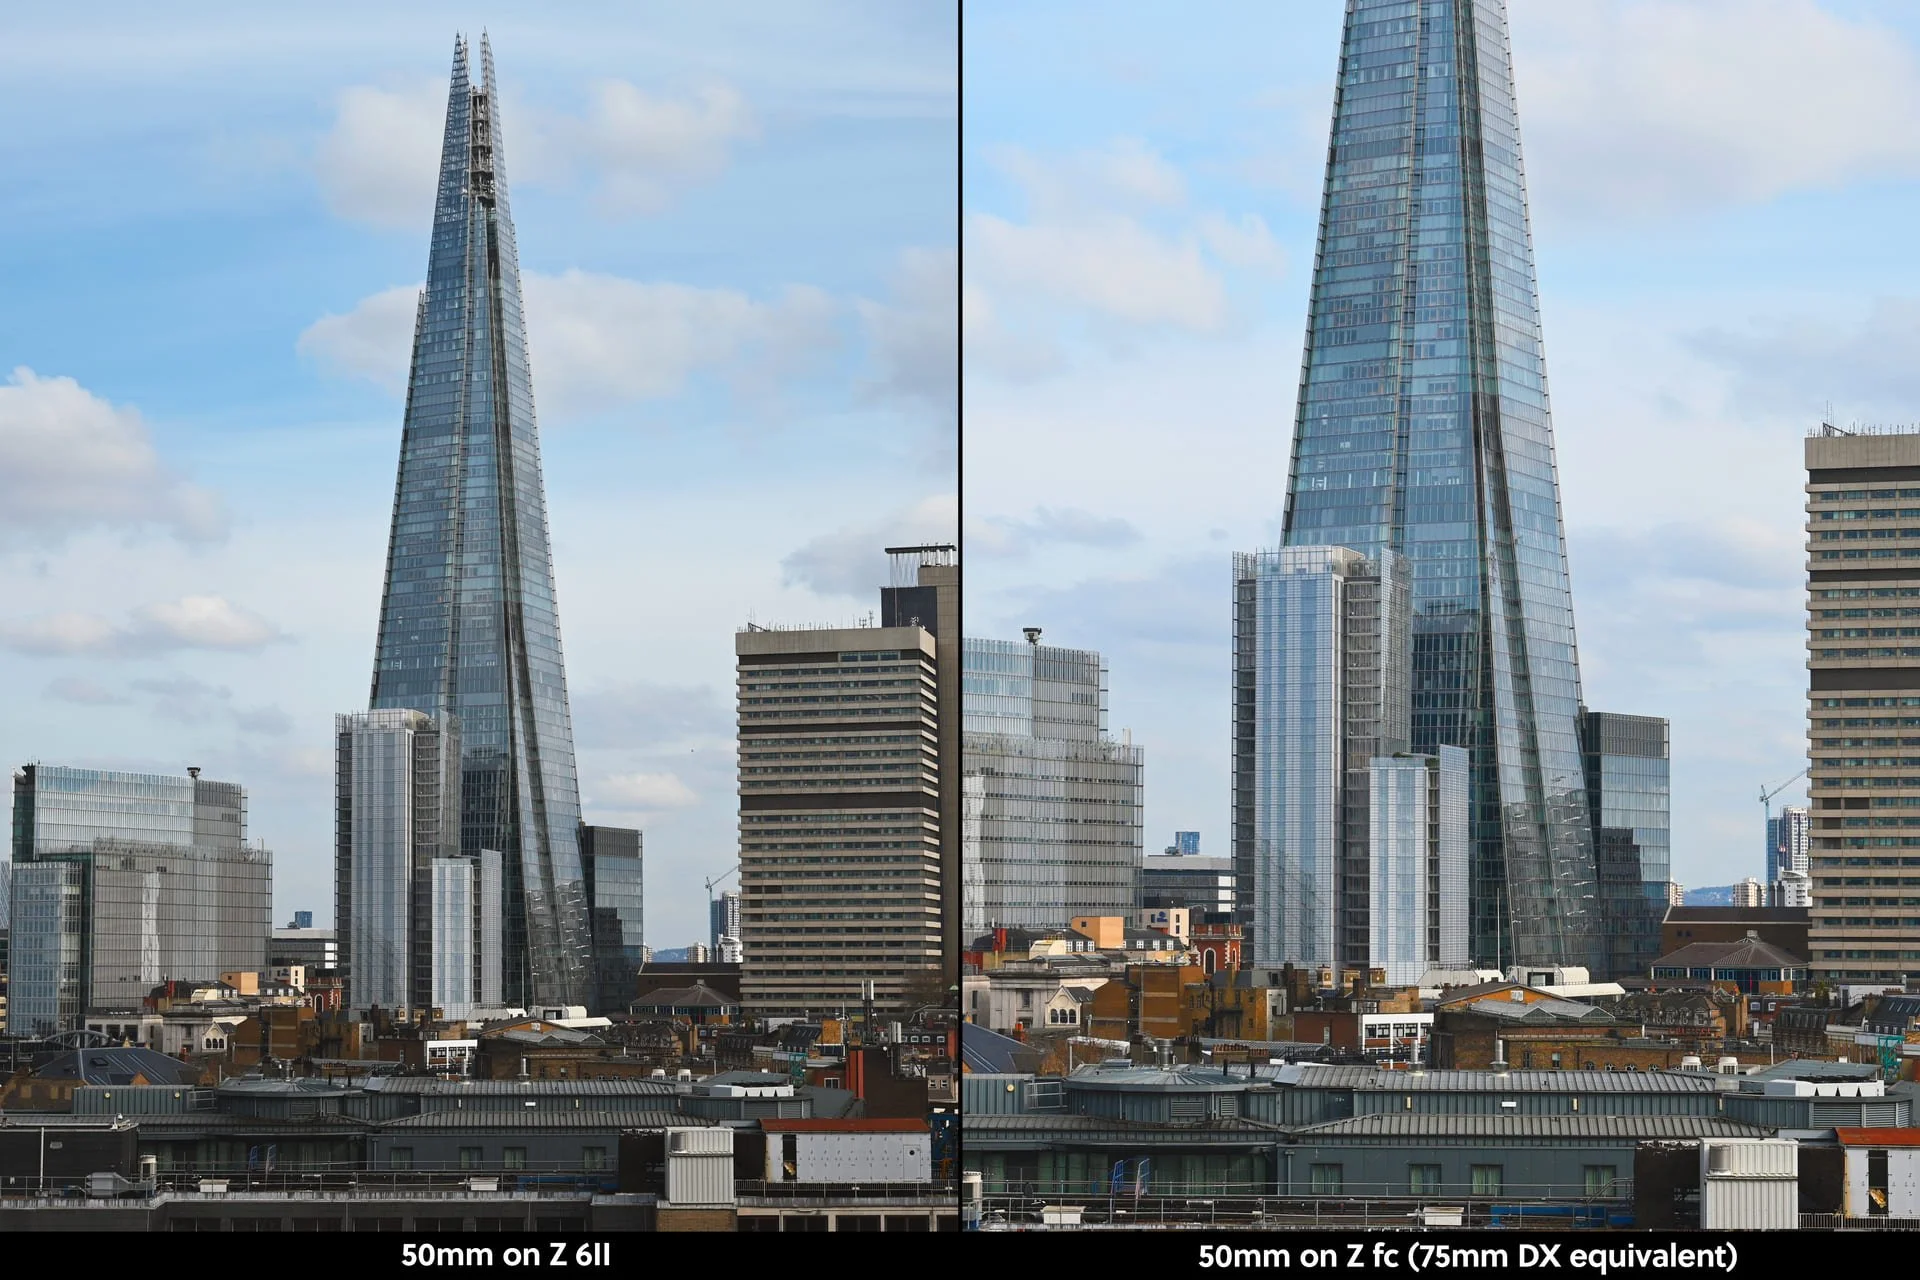
The left image has been taken on the Nikon Z 6II with the NIKKOR Z 24-70mm f/2.8 S with a focal length of 50mm. The right uses the Nikon Z fc with the NIKKOR Z DX 16-50mm f/3.5-6.3 VR at focal length 50mm. The right image appears cropped in because it has the DX equivalent crop of 75mm (50mm x 1.5 = 75mm).
Crop factor vs. focal length
Crop factor itself doesn’t physically alter the optical characteristics or design of a lens. Instead, it determines the effective field of view and angle of view you’ll achieve when using that lens on a particular sensor size.
For example, if you mount a NIKKOR Z 50mm f/1.8 S on a Nikon DX body with a 1.5x crop factor, you’ll get an angle of view equivalent to using a 75mm lens (50mm x 1.5x) on a full-frame FX camera. This is because the smaller DX sensor is only capturing and recording a tighter area in the middle of the image circle projected by that 50mm lens.
Calculation examples:
NIKKOR Z 24-70mm f/2.8 S on a Nikon Z fc (DX)
Overall equivalent range 36-105mm (24 x 1.5 = 36mm, 70 x 1.5 = 105)
NIKKOR Z DX 16-50mm f/3.5-6.3 VR on a Nikon Z fc (DX)
Overall equivalent range 24-75mm (16 x 1.5 = 24mm, 50 x 1.5 = 75)
NIKKOR Z 14-24mm f/2.8 S at 24mm focal length on a Nikon Z 8 (FX)
No crop factor change, focal length is true (14 x 1 = 14, 24 x 1 = 24)
Nikon’s current DX line-up
Nikon’s three DX mirrorless camera bodies utilise the APS-C-sized 20.9-megapixel sensors, resulting in a 1.5x crop factor when compared to full-frame sensors. The three bodies are compatible with Nikon’s line of affordable DX mirrorless lenses, as well as FX, full-frame lenses.
The Z 30 is the most affordable, focusing on vlogging and content creation needs. The Z 50 kicked off Nikon’s DX mirrorless system as an all-around performer. The Z fc provides a compelling retro design and experience.
The left image has been taken on the Nikon Z fc using the NIKKOR Z 24-70mm f/2.8 S at 50mm focal length (75mm DX equivalent as 50mm x 1.5 = 75mm). The right image is 50mm focal length taken on the Nikon Z 6II using the NIKKOR Z DX 16-50mm f/3.5-6.3 VR.
Why use DX?
While having a DX sensor does provide a tighter field of view compared to full-frame cameras, there are several key advantages to using Nikon’s DX format that make it an excellent choice for many photographers. The smaller size of the APS-C sensor allows for more compact and lightweight camera body designs. This improved portability can be invaluable for travel photography, hiking or any situation where minimising the overall bulk of your kit is beneficial.
Secondly, DX lenses are specifically designed to provide excellent image quality within the crop format, often at a more affordable price point compared to professional-grade FX lenses. This makes building a high-performing DX kit more accessible for enthusiasts and those on tighter budgets.
Not to mention the 1.5x crop factor can actually be advantageous in certain shooting scenarios. For disciplines such as sports, wildlife and other telephoto-biased applications where maximum reach is desired, the DX crop can provide a perception of ‘reaching’ subjects better and bringing them closer within the frame.
Wrap-UP
While understanding crop factor is crucial for selecting the ideal lenses and achieving your desired field of view, Nikon’s DX format remains an excellent choice for photographers who prioritise value, portability and versatility in their camera kit.
Continue Reading

Photographing winter landscapes: Advanced step-by-step guide
How to prep for photographing winter landscapes, ultimate camera settings, and how best to photograph snow, based on a road trip around Iceland.
This article was originally published here on the Nikon website.
How to prep for photographing winter landscapes, ultimate camera settings, and how best to photograph snow.
As a child, I never had the opportunity to travel due to my family’s financial circumstances. Instead, I read the likes of National Geographic Traveller and Wanderlust magazines from cover-to-cover. They became my passport to the unknown, my escape from the ordinary. Within those glossy pages, I discovered the world beyond the horizon, igniting a flame of wanderlust that would shape my dreams and aspirations for years to come.
Iceland, to a photographer, is a blank canvas with endless possibilities. The ever-changing weather adds an element of unpredictability, transforming scenes from ethereal mist to vibrant sunshine in mere moments. This year, I got to tick off Iceland, a destination that previously seemed so out of reach, from my bucket list. Planning an adventure like this is no mean feat, but here are my top tips.
© Scott Antcliffe
Prep like an Arctic explorer
Successful winter landscape photography starts by protecting yourself from the elements. Essentials include thermal base layers, mid-layers, waterproof outer jackets and trousers, a hat, stout boots and two or three pairs of gloves so you’ve always got dry ones handy. I tend to find the fingerless gloves with a mitten cover work well.
Pro tip
Pack chemical handwarmers for when biting winds cut through everything.
© Scott Antcliffe
Essential camera gear for winter landscape photography
The Nikon Z9’s mixture of speed, amazing autofocus and stunning picture quality make it a dream to use across the diverse, varying subjects and genres that I photograph. I’ve had it for 18 months and I love it. In Iceland, I used the AF-S NIKKOR 24-70mm f/2.8 ED VR and the AF-S NIKKOR 70-200mm f/2.8 E FL ED VR with the Mount Adapter FTZ II.
Tripods are essential for sharpness, supplemented by remote releases to eliminate vibration. Weight hooks and gear bags acting as ballast provide stability in the often unpredictable, climatic winds that Iceland (or other countries) can have. I used my sturdy and dependable Gitzo GT2545T tripod with a quick release plate, along with the Gitzo G2020 column weight hook with a Selens sandbag filled with some Icelandic sand to provide some ballast.
In extreme cold, set up gear behind a windbreak or even in the car. Fortunately, during my 12 days in Iceland the coldest it measured was -9°C. Plus, it goes without saying that you should bring extra batteries. The cold weather will quickly drain the battery, as will the use of the EVF. I would also highly recommend using a camera cover with drawstrings that will cover the lens.
Carry a set of neutral density filters to allow slower shutter speeds for smoothing wintery waters. A circular polarising filter deepens blue skies and reduces non-metallic glare. I use the LEE 100 Deluxe filter set which has a polariser, a 2, 3 and 4 stop neutral density graduated filter and the ‘Big Stopper’ – a 10 stop filter which I seldom use.
© Scott Antcliffe
How to battle exposure and metering challenges
Bright snow throws off meter readings, often underexposing mid and foreground elements. Depending on your camera and its metering system, meter an 18% grey card to set accurate exposure, then recompose or adjust if necessary. Your meter may be saying that the exposure is correct, but your actual images may tell a different story. Overexposing by 0.7 or even +1 could help render that pristine white look of snow.
When overexposing, you may get a slight blue cast to your images. If shooting in RAW you may be tempted to get rid of all the blue in your image, but this could lead to quite unnatural snow images. I always shoot in RAW as it gives me much more data in the file, making editing much easier. It’s especially beneficial for landscapes with a much wider dynamic range and it gives me the flexibility to tweak the White Balance.
If your image is blue, this would be due to the snow reflecting the sky. If there is direct sunlight on the snow, your images should have less of a blue tinge and it’s easier to get that bright white look in them.
Centre-weighted and spot metering readings may also help balance snow and shadows by giving you a more accurate exposure based on the amount of light available. It’s especially important in snowy landscapes as you don’t want to blow the highlights.
Bracket exposures to ensure proper detail in highlights and shadows are retained in post-production. It also gives you the opportunity to capture HDR images with more detail. It is a sure-fire way to guarantee you have more ‘keepers’ than culled images.
© Scott Antcliffe
Ideal camera settings for winter: f/11, low ISO and 1/2000 shutter speed
The time of day, available light and the subject you are photographing will dictate the best settings for your camera.
For general landscapes, I use f/11 aperture, the lowest possible ISO and a shutter speed that may vary from 1/400 to 1/2000. If photographing waterfalls, have a similar ISO and aperture, but change your shutter speed to something like 1/30 or even a few seconds. I’d use an 2-stop ND filter if aiming for anything slower than 1/30.
For night-time photography, set your aperture as wide open as possible, especially if trying to photograph the aurora or Milky Way. My ISO would vary depending on the light available to anywhere between 1200-3200 ISO. Time wise, it would be anything from 1 second to 20 seconds depending on what I was trying to capture.
With White Balance, I’d initially start on Auto and see if the results are close to what you are seeing with your eyes. If it’s not, you could try ‘sunshine’ or, if you are after a moody image, sometimes the ‘incandescent’ setting can work well. If you want to set your White Balance manually, try it at about 6500K, then make small adjustments as necessary.
A white snowy scene can be tricky to focus on, especially with autofocus, as it can constantly hunt to acquire focus. You would be better focusing manually and finding a contrasting colour, rock or building to focus on. You can always use live view and zoom in on the image to check you focus is accurate.
© Scott Antcliffe
Have a post-production checklist
Be prepared to carefully process winter imagery. Here’s my post-production checklist:
Adjust exposure, contrast and colour balance to accurately render glistening snow, pale skies and muted shadows.
Slightly tweak contrast curves to showcase sparkling highlights.
Increase vibrance to compensate for flat light.
Darken brighter snow areas via luminosity masks to pull out shadow detail.
Remove any distracting sensor dust spots camouflaged against the snow.
Continue Reading
Writing
As a regular writer and photographer for Nikon, I contribute articles and photography guides covering diverse topics like long exposure photography, capturing the Aurora, and winter landscape photography. My work for Nikon has been translated into multiple languages worldwide. I also contribute regularly to the Yorkshire Post newspaper, covering travel, music, and sport.